How Does Embroidery Digitizing Work With DST Files?
Embroidery Digitizing is the process of converting artwork, logos, text, or other designs into a format that an embroidery machine can understand. One of the most widely used formats for machine embroidery is the DST file. Understanding how digitizing works with DST files is important for anyone who wants clean, professional, and accurate embroidered designs.
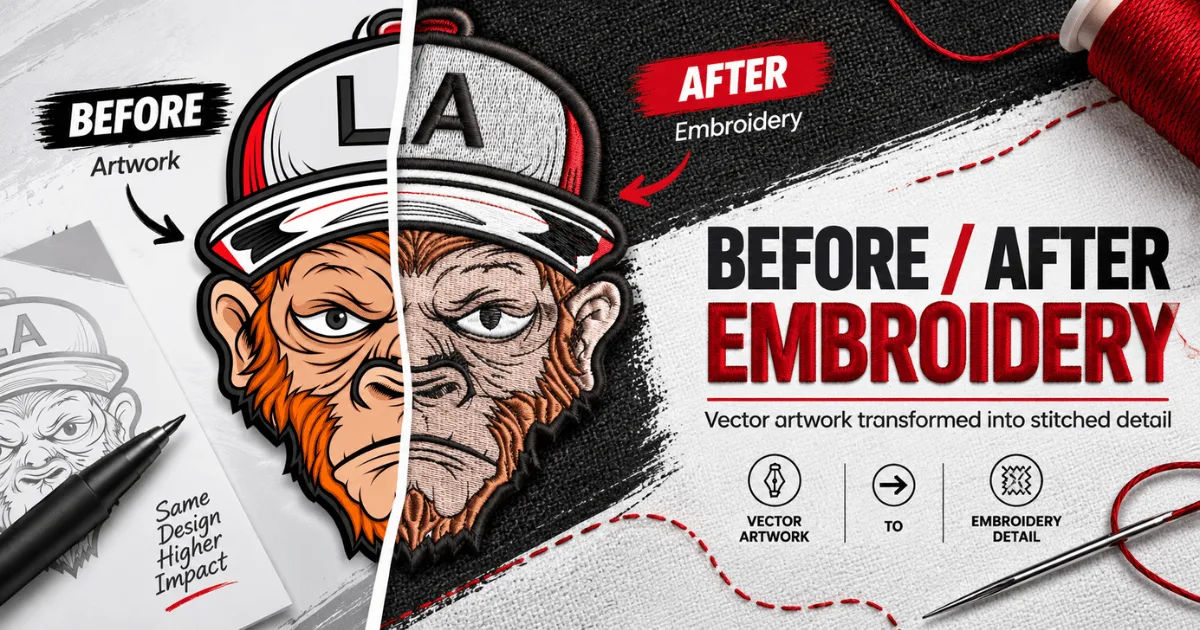
A DST file does not contain a normal picture in the same way as a JPG or PNG. Instead, it contains stitching instructions. These instructions tell an embroidery machine where to move, when to stitch, which direction to follow, and when to stop or change colors.
The quality of the final embroidered product depends heavily on how well the original artwork is digitized. A poorly prepared file can result in uneven stitching, gaps, excessive thread buildup, or distorted shapes.
This guide explains how embroidery artwork is converted into a DST file, what information the file contains, how embroidery machines read it, and what factors should be considered when preparing a professional design.
What Is a DST File?
DST stands for Data Stitch Tajima. It is a common embroidery machine file format originally associated with Tajima embroidery machines.
Today, DST files are widely supported by commercial and industrial embroidery machines. Because of their broad compatibility, many embroidery digitizing professionals use DST as a standard format when delivering machine-ready designs.
A DST file primarily contains stitch coordinates and machine movement commands. These commands allow the embroidery machine to reproduce the design on fabric.
Unlike an image file, a DST file does not simply tell the machine what the design looks like. It tells the machine how to physically create that design using thread.
What Information Does a DST File Contain?
A DST file can contain information such as:
-
Stitch locations
-
Stitch movement directions
-
Jump commands
-
Trim commands, depending on machine interpretation
-
Color-change commands
-
Design dimensions
-
Stitch sequence
-
Machine movement instructions
The file essentially acts as a set of instructions for the embroidery machine.
What Is Embroidery Digitizing?
Embroidery Digitizing transforms visual artwork into a sequence of stitches. The digitizer analyzes the design and decides how different parts should be embroidered.
This is much more than converting an image from one file extension to another. A professional digitizer must understand fabric behavior, stitch types, thread, density, underlay, sequencing, and machine limitations.
For example, a circular logo may look simple on a computer screen. However, reproducing that circle with thread requires careful planning. The digitizer must determine the appropriate stitch type, direction, density, and sequence.
Why Can't a JPG Simply Be Converted Into DST?
A JPG contains pixels, while a DST file contains machine instructions.
An embroidery machine cannot look at a JPG and automatically understand which areas should use satin stitches, which should use fills, and where individual stitch paths should begin and end.
Automatic conversion tools can sometimes create a basic embroidery file, but the results may not be suitable for professional production.
Manual digitizing or careful editing is usually necessary when high-quality embroidery is required.
How Does the Digitizing Process Work?
The process usually begins with artwork supplied by a customer or designer. The artwork may be provided as a JPG, PNG, PDF, AI, EPS, or another graphic format.
The digitizer studies the artwork before creating the embroidery design.
Step 1: Analyze the Artwork
The first step is understanding the design.
The digitizer examines its shapes, outlines, lettering, colors, fine details, and overall size. They also consider where the design will be embroidered.
A logo intended for a cap may require different treatment from the same logo intended for a jacket back.
Fabric type also matters. Cotton, denim, fleece, leather, and performance fabrics can behave differently during stitching.
Step 2: Separate Design Elements
The artwork is divided into different sections.
For example, a logo might contain a background, lettering, borders, and small decorative elements. Each section may require a different stitch type.
This separation allows the digitizer to control how the machine builds the design.
Step 3: Select Appropriate Stitch Types
Different areas of a design require different stitches.
Common stitch types include satin stitches, fill stitches, and running stitches.
Satin stitches are often used for borders, lettering, and narrow shapes. They create a smooth appearance by placing stitches across an area.
Fill stitches are useful for larger sections. They cover broader areas with repeated rows of stitches.
Running stitches are commonly used for outlines and fine details.
Choosing the wrong stitch type can make the design look rough or cause unnecessary thread buildup.
Step 4: Set Stitch Direction
Stitch direction has a major effect on the appearance of embroidered artwork.
The digitizer decides which direction stitches should travel in different areas. Changing stitch angles can help create visual depth and make the design more attractive.
Proper stitch direction can also reduce problems such as fabric distortion and uneven coverage.
Step 5: Add Underlay Stitches
Underlay is a layer of stitching placed underneath the visible stitches.
It helps stabilize the fabric and provides a foundation for the top layer of embroidery.
Without suitable underlay, some designs may look weak or uneven. The appropriate underlay depends on factors such as fabric type, design size, and stitch type.
Step 6: Adjust Stitch Density
Stitch density refers to how closely stitches are placed together.
Too little density can leave fabric showing through the design. Too much density can create excessive thread buildup and may cause the fabric to become stiff or distorted.
Professional embroidery digitizing requires finding a suitable balance.
The correct density depends on the material, thread, design dimensions, and stitch type.
How Is the DST File Created?
Once the design has been planned, digitizing software is used to create the stitch paths.
The digitizer creates objects and assigns stitch properties to them. The software then converts those objects into machine-readable commands.
At this stage, the design is no longer simply an image. It has become a structured embroidery pattern.
The digitizer can usually see a simulated preview showing how the stitches will be generated.
After reviewing the design, the file can be exported into the required machine format.
Exporting the Design as DST
When the design is ready, the digitizer selects DST as the output format.
The software converts the stitch information into a DST file containing the necessary machine commands.
The resulting file can then be transferred to a compatible embroidery machine.
It is important to remember that exporting a design as DST does not automatically make the design high quality. The quality comes from the decisions made during the digitizing process.
How Does an Embroidery Machine Read a DST File?
After the DST file is transferred to an embroidery machine, the machine interprets the stitch instructions.
The machine moves the embroidery hoop according to the coordinates stored in the file. At the same time, the needle moves up and down to create the programmed stitches.
When the design requires a different thread color, the machine can stop or issue a color-change command, depending on the machine's setup and how the file is interpreted.
The machine follows the sequence established during digitizing.
This is why stitch order is so important.
Why Stitch Sequence Matters
Stitch sequence determines which parts of the design are embroidered first and which are embroidered later.
A good sequence can reduce unnecessary jumps and trims. It can also help prevent areas of the design from being covered incorrectly.
For example, a background element usually needs to be completed before a foreground element. Otherwise, later stitching may cover or interfere with earlier work.
Experienced digitizers organize the design so that the machine can produce it efficiently.
Reducing Unnecessary Machine Movement
Efficient sequencing can reduce unnecessary movement.
Fewer jumps and trims can result in faster production and a cleaner finished design.
Poor sequencing may cause excessive thread changes, unnecessary jumps, and additional production time.
Therefore, professional digitizing considers both appearance and machine efficiency.
DST Files and Thread Colors
One important detail about DST files is that color information can be handled differently from what people may expect.
A DST file can contain color-change commands, but it does not necessarily preserve exact thread brand names or precise color specifications in the same way a modern image or design file might.
The embroidery operator may therefore need to assign actual thread colors using the machine's thread library or production instructions.
For consistent results, the digitizer should provide clear color information alongside the DST file when required.
What Makes a Good DST File?
A good DST file should produce embroidery that is clean, stable, and visually accurate.
Several factors contribute to this quality.
Proper Stitch Density
Density should be appropriate for the fabric and design size.
Excessive density can cause stiffness and puckering, while insufficient density may produce weak coverage.
Correct Underlay
Underlay provides stability and helps the top stitches maintain their intended appearance.
The type and amount of underlay should be selected according to the design and material.
Efficient Stitch Direction
Consistent and intentional stitch angles improve the appearance of embroidered surfaces.
They can also help control fabric movement.
Appropriate Stitch Sequence
A well-planned sequence improves efficiency and reduces unnecessary machine movements.
Suitable Stitch Length
Very short stitches can create excessive density. Very long stitches may become loose or fail to provide adequate coverage.
The digitizer must choose stitch lengths that work for the specific design.
Testing a DST File Before Production
A design should ideally be tested before large-scale production.
A test sew allows the digitizer or embroiderer to identify problems that may not be obvious on a computer screen.
The design can be stitched onto a fabric similar to the final product.
What Should Be Checked During Testing?
The test should be examined for:
-
Thread breaks
-
Puckering
-
Gaps
-
Uneven outlines
-
Poor registration
-
Excessive thread density
-
Incorrect color changes
-
Small details that disappear
-
Unwanted jumps or trims
If problems appear, the DST file may need to be edited and tested again.
This testing stage is particularly important for logos and branded clothing because consistency matters across multiple products.
Common Problems With DST Files
Even when a file opens successfully, it may not produce good embroidery.
One common issue is excessive stitch density. This can cause thread buildup and make the embroidered area feel heavy.
Another issue is poor registration. When different sections do not align properly, outlines may appear shifted.
Small lettering can also become difficult to read. A design that looks perfect on a large computer screen may lose detail when reduced to a small embroidery size.
Problems Caused by Incorrect Scaling
Embroidery designs should not always be resized dramatically after digitizing.
Changing the size can alter the relationship between stitch length, density, and design details.
For example, reducing a large DST design significantly may make its stitches too dense for the smaller version.
For this reason, important designs are often digitized separately for different sizes.
DST Files for Different Embroidery Applications
DST files can be used for many embroidery applications.
They are commonly used for:
-
Company uniforms
-
Caps
-
Jackets
-
Polo shirts
-
T-shirts
-
Workwear
-
Bags
-
Patches
-
Promotional products
-
Sports clothing
However, the same artwork may need different digitizing settings depending on the product.
A design for a cap may need adjustments because of the curved surface and limited embroidery area.
A jacket-back design can use different stitch structures because it has more space.
How Fabric Affects Digitizing
Fabric is one of the most important considerations in professional Embroidery Digitizing.
Lightweight fabrics can require careful stabilization because excessive stitching may distort the material.
Stretch fabrics may need additional support to prevent movement.
Thicker fabrics such as denim can tolerate different stitch structures and densities.
Fleece and textured materials may require suitable underlay and stitch coverage to prevent the fabric from showing through the design.
This means a digitizer should not treat every embroidery project exactly the same way.
How Design Size Affects DST Files
Design size has a direct impact on stitch settings.
A large design can generally accommodate more detail than a very small design.
Tiny lettering, narrow outlines, and small decorative elements may become unclear when reduced.
A professional digitizer may simplify certain details rather than trying to reproduce every tiny feature.
This is an important part of Embroidery Digitizing because embroidery is created with physical thread, not pixels.
Can DST Files Be Edited?
Yes, DST files can be edited using compatible embroidery software.
However, editing a DST file is not always as flexible as editing the original digitized project file.
The original working file may contain editable objects and settings that are not fully preserved in the exported DST format.
For this reason, it is useful to keep the original native digitizing file as well as the final DST file.
If significant changes are needed later, having the original working file can save considerable time.
DST Compared With Other Embroidery Formats
DST is one of several embroidery file formats.
Other formats may include PES, EXP, JEF, VP3, and others. Different embroidery machines and software may prefer different formats.
DST remains popular because of its broad compatibility, particularly in commercial embroidery environments.
However, the best file format depends on the embroidery machine being used.
Before sending a design to production, it is important to confirm which format the machine supports.
How to Prepare Artwork for Digitizing
High-quality artwork can make the digitizing process easier.
If possible, provide a clean, high-resolution version of the logo or design.
Vector artwork such as AI, EPS, or SVG can be especially useful because shapes and outlines are easier to identify and reproduce.
However, a skilled digitizer can often work with raster images as well.
The artwork should ideally include clear information about intended colors, final size, and placement.
Why Professional Digitizing Matters
Professional Embroidery Digitizing requires both technical knowledge and artistic judgment.
Software can automate certain tasks, but it cannot always understand the physical behavior of fabric and thread.
An experienced digitizer knows how to simplify details, control stitch density, select suitable stitch types, and organize the sequence.
These decisions directly affect the final embroidered product.
A well-digitized design can save production time, reduce thread breaks, improve consistency, and create a more polished appearance.
Tips for Getting Better DST Results
There are several practical steps that can improve results.
First, always provide accurate artwork and specify the intended embroidery size.
Second, identify the fabric before digitizing.
Third, avoid expecting extremely small artwork to reproduce every detail from the original graphic.
Fourth, request a sew-out or sample when the design is important or complicated.
Finally, keep the original digitizing file for future edits.
These simple practices can prevent many common production problems.
Conclusion
DST files play an important role in modern machine embroidery because they convert a digitized design into instructions that embroidery machines can follow. However, creating a useful DST file involves much more than saving an image in a different format.
The process begins with analyzing artwork and separating its elements. The digitizer then selects suitable stitch types, establishes stitch directions, adds underlay, controls density, and creates an efficient stitch sequence. Once these decisions are complete, the design can be exported as a DST file and transferred to a compatible embroidery machine.
The success of Embroidery Digitizing depends on understanding how digital artwork behaves when converted into physical stitches. Fabric type, design size, thread, stitch length, density, and machine capabilities all influence the final result.
Testing is another important part of the process. A sew-out can reveal problems such as puckering, gaps, thread breaks, poor registration, or details that are too small to reproduce effectively.
DST is widely used because of its compatibility with many commercial embroidery systems. Nevertheless, the quality of the finished embroidery depends primarily on the quality of the underlying digitization rather than the file extension itself.
For businesses, clothing brands, promotional companies, and anyone producing embroidered products, professional Embroidery Digitizing can make a major difference. A carefully prepared file helps the machine work efficiently while producing cleaner, sharper, and more consistent embroidery.
Ultimately, a DST file should be viewed as a detailed set of production instructions rather than simply an image file. When those instructions are thoughtfully created, tested, and adjusted for the intended fabric and size, the embroidery machine can reproduce the original artwork with much greater accuracy and reliability.
